Let’s say you have a Linux Amazon Web Services (AWS) EC2 Instance up and running and you start running out of space. I’ll show you how to quickly clone its disk (EBS volume) onto a bigger disk (also EBS), replace the smaller disk with the bigger one and boot off the bigger (new) disk. No need for any third party tools like Acronis or Ghost or even rsync.
Create Snapshot of the original disk:
First thing we’ll do is to create a Snapshot of the original disk so that we can then create a new, bigger volume out of that Snapshot. There are a couple of things we have to note down first: the Instance number and then the volume attached to that Instance. The easiest way to fine the Instance number is in the Instances part of the AWS Management Console. It will start with “i” and be under the “Instance” column. Now navigate to the Volumes section (Elastic Block Store section) and locate the volume that is attached to your Instance. You can see the Instance number under the “Attachment Information” column. The first half of that string will be the Instance number. Please see the images below for an example.
Instance (in this case number is i-1920b74c):
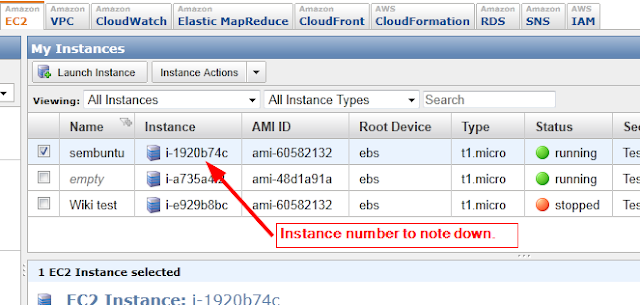
Please also note which Zone your Instance is in. This will be important for later. In my case the Zone is “ap-southeast-1b” in the Singapore Region. The Zone can be seen by selecting the Instance and looking under its Description tab (bottom).
Volume (note the Instance number):
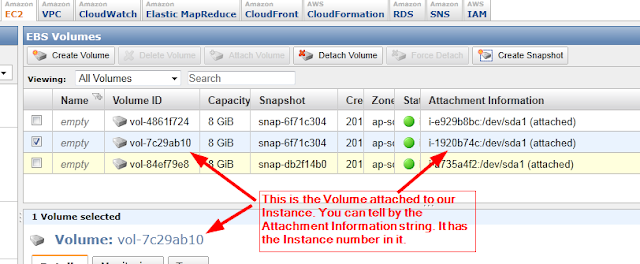
As you’ll notice in the examples above, the size of the original Volume (EBS Disk) is 8 GB. I’ll increase that to 25 GB.
Creating a Snapshot
To create a snapshot of the Volume you simply right-click on it and click on Create Snapshot. Or you can select the Volume and click on the Create Snapshot button at the top.

Please note that I am creating a Snapshot of the running virtual machine. If you have a database on it or some other application that has a lot of transactions happening then it would be best to turn the virtual machine off (schedule some downtime) and do the Snapshot.
Give the Snapshot a meaningful description and a name. Click on “Yes, Create”.
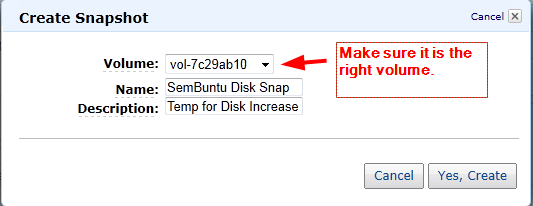
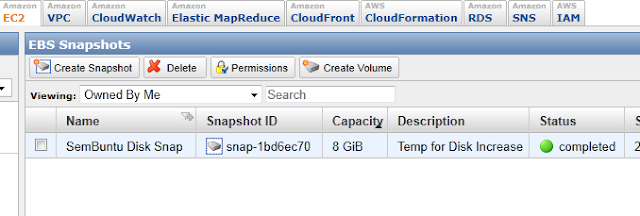
Once done, you will be able to see your Snapshot in the Snapshots part of the Elastic Block Store area. See example below. Please note the Name, Description and Capacity (original 8 GB).
Creating a new (clone) Volume
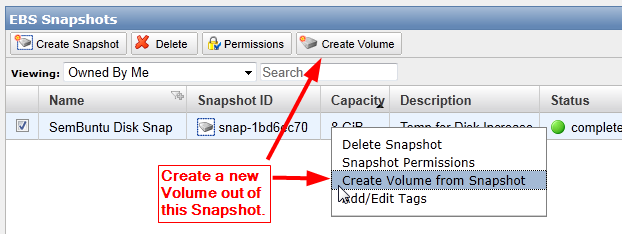
Next, we’ll create a Volume out of the Snapshot. Simply right-click on the Snapshot and select “Create Volume from Snapshot” from the resulting menu or you can use the button at the top.
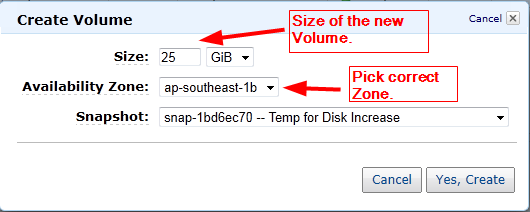
Put in the desired Size of the new Volume and make sure the Availability Zone coresponds to the AZ that the original Instance is in. Click on “Yes, Create”.
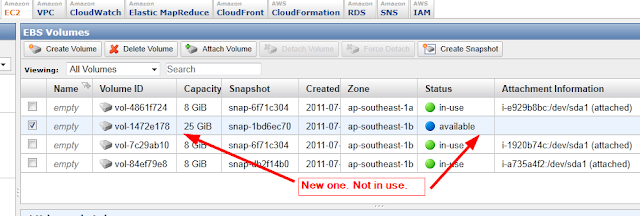
If you navigate to the Volumes section you will see the new 25 GB volume there. You’ll notice that it is not in use.
Attach new Volume to existing Instance:
And now for the fun part. We will stop the Instance, detach the original 8 GB Volume, attach the new 25 GB Volume and make sure we are able to boot. Please note the new Volume will have the data up to the point when the Snapshot was taken. If the original machine had more data put onto it since the Snapshot then that will have to be dealt with. This is beyond the scope of this tutorial.
Stop the Instance (if it is running).
Go to the EBS Volumes section, select the original Volume, right click on it and select “Detach Volume”. You can also use the Detach Volume button. When prompted, please select “Yes, Detach”.

To attach the new Volume right-click on it and select “Attach Volume”.
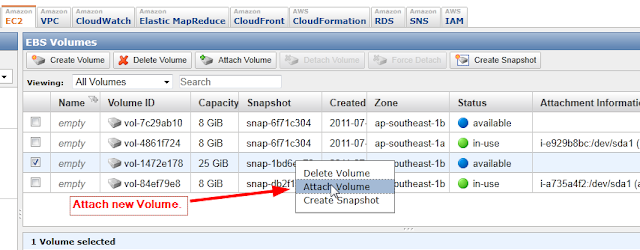
Make sure you select the correct Instance. In the example below I am also modifying the Device to be the same as the original one. The example is for a Linux (Ubuntu) Instance. This is important. Click on “Yes, Attach”.
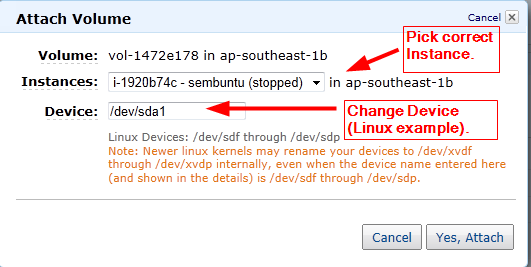
The Status should change to “in-use”.
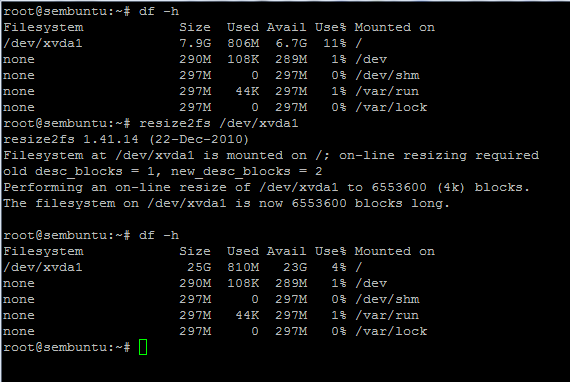
Go back to your Instance and start it up. Log back into your Linux Instance and run the following command (for ext3 file system):
resize2fs /dev/xvda1
Please note that the device is not called sda1 but xvda1. The device was renamed by the Kernel.
After it is done you should be able to see the full 25 GB. use the “du -h” command. Example:
Cleanup:
Once you’ve made sure all works as it should and that all your data is fine on the new Volume, you can remove the Snapshot and the old Volume if you do not intend to use them anymore. Go to the relevant AWS Management Console sections and remove (delete) them.
One Last Thing:
After completion of above steps Please associate the existing instance with IP address.
Step 1:Click on Elastic IPs tag in NETWORK & SECURITY
Step 2:Right click on your previous instance IP address and select associate.
Step 4:Which generates popup select the instance from drop down.
Step 5:Click on yes.

No comments:
Post a Comment